Webfly team 4 min read
How can I replace my website while keeping the existing site online?
Prepare your new site in Webfly preview, preserve email records and switch the primary domain when ready. A step-by-step guide with product screenshots.
Contents
Yes. With Webfly’s hosted yearly plan, you can prepare a new website at a separate preview address before redirecting your existing domain. Visitors continue to reach the old website during preparation. After reviewing the new site, change DNS routing and switch to the primary domain.
This separates preparation from the actual switch. DNS propagation and SSL preparation take time, so the process does not guarantee zero downtime at cutover. This guide covers hosted Webfly services whose installation has not started. Automatic import of content from another CMS is not part of this workflow.
1. Record your existing website and email setup
Back up the old site’s files and database. List important page URLs, contact forms and your email provider. Keep a copy of the existing DNS records.
Leave your existing hosting active while the new site is prepared. Do not change the domain’s NS or website A records yet. You can enter the existing content into your new theme yourself or ask our team about migration assistance.
2. Prepare in preview first
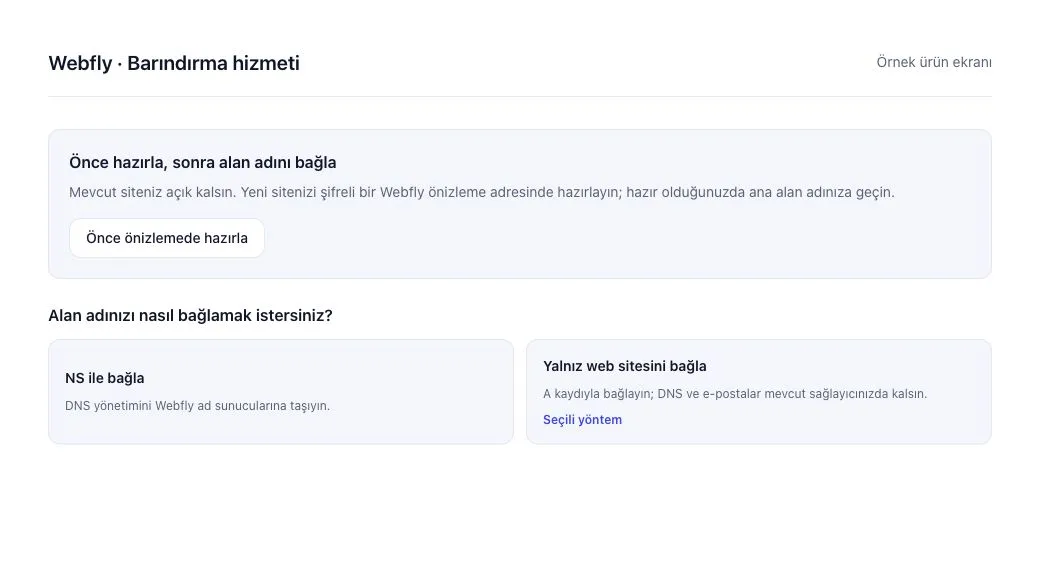
After approval of your hosted yearly purchase and preparation of the service, open My services → Hosting service in your account. Before installation starts, choose Prepare in preview first. Enter your site name, administrator details and language, then start installation.
Webfly supplies an address in its own preview domain. You do not need to create a subdomain under your existing domain. The preview is password-protected and excluded from search engines. Your existing website and email DNS routing stay unchanged until you switch the primary domain. Share preview access only with authorized people.
3. Prepare and check the content
When installation finishes, sign in to the admin panel. Add your logo, business details, pages, images and menus. Replace example content with your own information and verify the behavior as well as the appearance.
- Check menus, images and text on a phone and a computer.
- Test phone, email and contact links; confirm form submissions arrive.
- Write page titles and descriptions that match the content.
- Match important old URLs to their counterparts on the new site.
If page URLs must change, separately plan permanent redirects from old URLs to their new counterparts. Preview installation does not create this mapping automatically. Google recommends URL mapping and redirects for site moves that change URLs. Google’s site-move guide
4. Choose A records if email stays with the existing provider
Connect website only redirects the website to Webfly without changing the NS addresses. Apply the primary-domain and www records shown on your own service page in your DNS provider’s panel. Do not copy an IP address from another customer’s screen or from the examples in this guide.
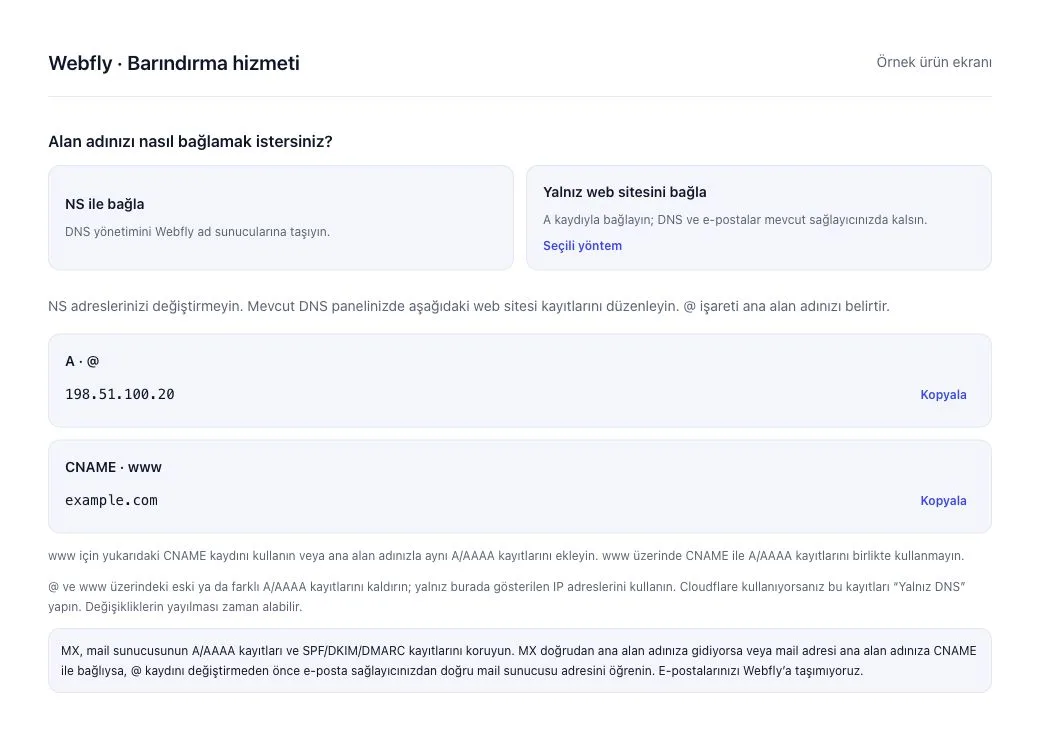
Preserve MX records, the mail server’s A/AAAA addresses and SPF/DKIM/DMARC records. If MX targets the primary domain, or the mail hostname is a CNAME for it, changing the website A record can affect email. Ask your email provider for the correct records before proceeding. This operation does not move email service or mailboxes to Webfly. Cloudflare’s explanation of email DNS records
If you also want to move DNS management, choose Connect with NS. First confirm that the existing DNS and email records are ready at the new DNS provider. A-record routing is a narrower change when email should remain with the existing provider.
5. Switch the primary domain when ready
After preview installation finishes, open Switch to primary domain on the service page. Update the DNS records for your chosen connection method and select Check DNS and switch to primary domain.
Webfly verifies the routing. If records do not match yet, the switch is not started; review the records or allow DNS propagation, then try again. After successful verification, Webfly prepares SSL, the site address and license for the primary domain. Content prepared in preview is preserved.
When the operation finishes, check Publish site in the admin panel. Connecting the domain and making the website public are separate checks. Keep the old hosting active until the new domain and contact flow have been verified.
After-publication checklist
- Open the primary domain and www over HTTPS and check the site and certificate.
- Retest menus, images, phone links and the contact form.
- Test both sending and receiving with your existing email account.
- Check important old URLs and any redirects.
- Confirm that the new site permits search indexing and that its sitemap uses the correct domain.
Preview helps keep your existing site online during preparation. Content review, email dependencies and changed URLs still belong in your transition plan. Review hosting and installation requirements, compare the hosted plan or contact us to plan your transition.